Learning as We Go: The Care and Feeding of an Old Workboat
The certification process had become considerably more complicated since I'd last gone through it 27 years before with my schooner Windfall so it was not until October 3 that we finally received the Coast Guard's green light. That put us at the very end of the tourist season, just in time to turn our attention to all the cosmetic issues that had been put on hold during the more urgent business of obtaining the certificate. Most of this work involves cleaning, sanding, painting and varnishing but some of it deals with replacing worn out stuff.
.jpg)
I mentioned that the skipjack was 95% restored. The boat was originally built in Wingate, MD in 1940 by a famous shipwright named Bronza Parks. She dredged oysters on Chesapeake Bay until 1996 when, badly rotted, she was purchased by Herb Carden of Sandy Point, VA. Mr. Carden had a deep affection for the Chesapeake's work boats and a strong desire to preserve them. Fortunately for Wilma Lee, he also had a large lumber company. As Mr. Carden and his employees began to strip away the deteriorated wood, they soon realized the boat was in worse shape than expected. Practically everything except the keel, stem and spars had to be replaced with new material. But finally, in 2002, she was relaunched looking better than ever.
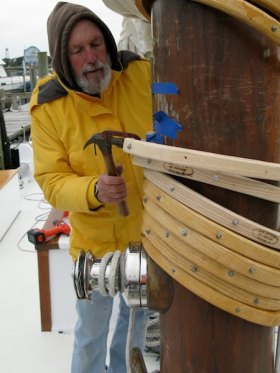
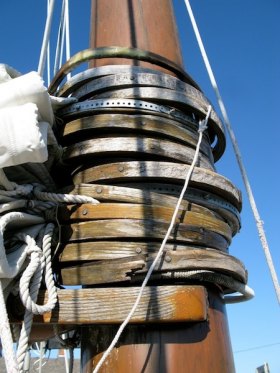
Along with the original spars, Mr. Carden retained the original mast hoops. These are laminated wooden rings (17 of them) which encircle the mast and attach to the luff (forward edge) of the main sail. To be honest, neither I, the two surveyors who checked out the boat nor the coast guard inspectors had paid much attention to the condition of these babies until (wouldn't you know it?), the day we had to take the coast guard inspectors on a sail. We hoisted the gigantic main sail, the wind billowed it out and three of the mast hoops flew into pieces that showered down on us! Needless to say, there was a lot of throat clearing and eye rolling as I assured the inspectors that (a) we still have 14 hoops holding the sail in place and (b) we'd replace all of the hoops with new ones as soon as possible.
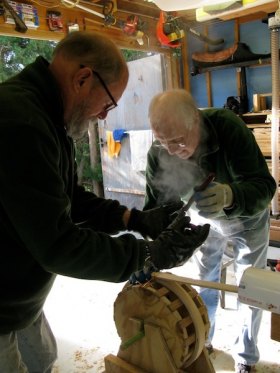
Recently, Bill Monticone got down to the serious business of making new mast hoops. After scanning the internet for advice on how to proceed, he built a custom steam box out of PVC pipe, a molding wheel out of plywood, and proceeded to manufacture ash hoops. (Read more about this process below.) He asked me how I thought we should get the new hoops onto the mast (short of pulling the 65' cypress trunk clean out of the boat!). It was obviously a choice of either spiraling the hoops onto the mast like a key on a key ring and then fastening them together with rivets and/or bolts, or borrowing a bucket truck, going to the top of the mast, detaching all of the standing rigging (wires that support the mast), and dropping them down from the top.
I didn't know the answer but I did know that there was only one best way to do it and that Capt. Ed Farley would know what it was. Sure enough, a brief e-mail exchange with Capt. Ed told me exactly how to proceed (the key chain approach). It wasn't the first time I'd turned to Ed Farley for advice and I'm pretty sure it won't be the last. Followers of this erratic column may recall that he was the oyster-dredging captain who, on a cold day last March, took me and two other gluttons-for-punishment on an all day dredging trip out of Deal Island, MD. At the tender age of 61, he was far from the oldest of Chesapeake Bay's six remaining skipjack skippers. That distinction belonged to The Reverend “Daddy Art” Daniels who was exactly 30 years older! Last I heard from Capt. Ed, “Daddy Art” is still at it this year at 92.
I'm frequently asked by my passengers if I've been a sailor all my life and if I don't say, “not yet!” I usually say, “so far.” But I've always been quick to point out that I'm still just learning. If I thought I knew anything about sailboats and sailing, I've recently come to realize there was a lot I didn't know about skipjacks which are somewhat of a breed appart.. But it's been a relief and a pleasure to discover that the small but dedicated fraternity of skipjack owners consists of a terrific bunch of guys who are always happy to share what they know. This includes not only Capt. Farley but also Capt. Ben Bunn of the Ada Mae in New Bern, Capt. Wade Murphy of the Rebecca T. Ruark in Tilghman Island, MD, Capt. Jack Russell of Dee of St. Mary's in St. Mary's, MD and Capt. Frank Newton of the Nathan of Dorchester in Cambridge, MD. (There are several others but these are the ones whose advice I've requested and received). Pretty much all of them, myself included, are, like most of the Wilma Lee's volunteers, eligible for $1 cups of coffee at McDonalds. These vessels, which date back to the late 1880's, don't seem to hold much appeal for the younger generation of mariners.
Having been a great eater of oysters since my early teens, I also might have thought I knew a thing or two about Crassostrea Virginica (Atlantic Coast oysters). I even spent a summer of my college years at the University of Georgia Marine Institute at Sapelo Island working on a federally funded oyster study. But kind friends have recently lent me a great number of books about oysters: not only the biology but the history, economics and politics as well as the technology of cultivation, harvesting, transporting and cooking of these critters. Clearly I've got a lot to learn in that department as well but, hey, there's plenty of time. I'm not even seventy yet!
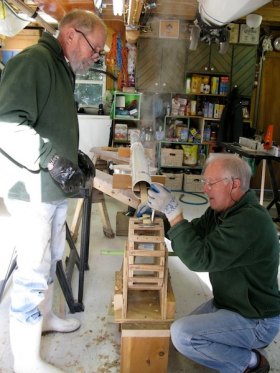
- Two thin strips of ash (1.5”x .25” x 10') were placed in a 220-degree steam box for 20 minutes.
- The strips were clamped and rolled onto a 15” plywood drum.
- After drying at room temperature, the drum was placed in a warm oven for 3 hrs.
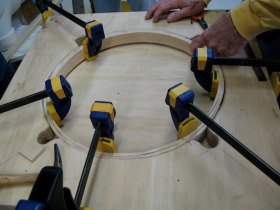
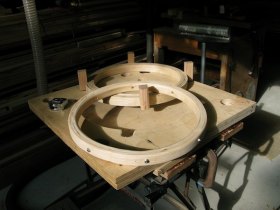
- The strips were removed from the drum and clamped, one inside the other, into a plywood female mold.
- The clamps were worked around and around the mold, releasing and clamping alternately to minimize voids.
- Holes were drilled and 8 stainless bolts were inserted in each hoop.
- The hoop was removed from the mold and run through a router to round the edges.
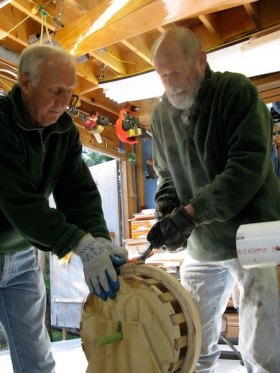
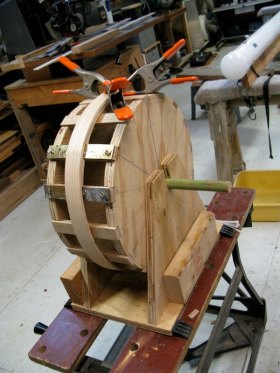
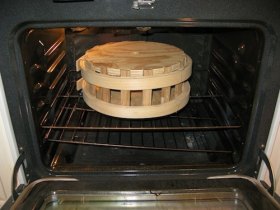
Then the hoops were taken to the boat where:
1. Each bolt position was marked with a pencil
2. Each hoop was disassembled
3. The inner ring was wound onto the mast like a key ring on a key
4. Holes were drilled and the inner ring was fastened together with two copper rivets
5. The outer ring was wound on and fitted to the inner ring (aligning pencil marks)
6. The bolts, washers and nuts were installed
7. The bolt ends were ground off
8. Three coats of varnish were applied
9. The hoops were laced onto the luff (forward edge) of the main sail
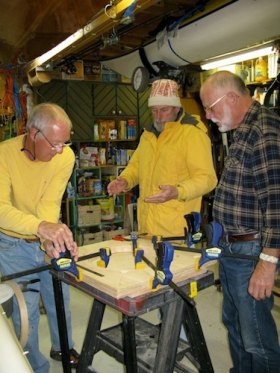
Actually, it wasn't quite as easy as this all sounds! Special thanks to Bill Monticone for his ingenious planning and implementation as well as the use of his shop, kitchen, and tools. I'm also deeply indebted to Tom Wright who generously provided the ash and helped Bill with getting the project started, and to Susse Wright who not only took even more photographs than I had room for in the article but helped Bill with the project from start to finish. She even taught us a few handy Danish expletives for when things don't quite go as they should!
